Extending disk space in centos (vmware)
When you extend storage of a CentOS VM from virtualization platform, it is not directly reflected in the VM. Here is a extensive guide on how to extend disk space to add additional storage to the existing partition. For the blog we are going to extend the partition for / mount.
Verify current disk space
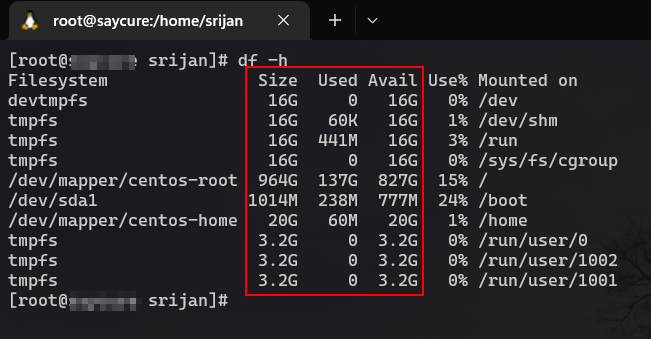
Before we start, verify if the disk is already reflected on the system using command below:
1
df -h
The command displays the disk used and free in the current filesystem. From the output verify if the extended partition is not currently reflected in the output. If no, continue to next step.
Identify partition
1
lsblk
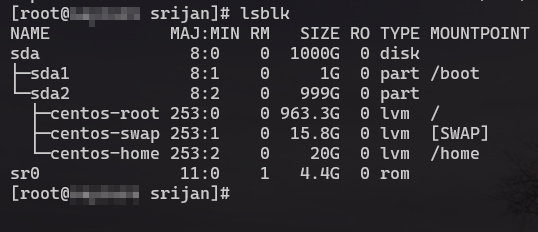
The above command displays the current partition with the space
From the provided output, identify if any additional space is pending in the root partition. For example, in the optimal configuration the size of sda2 should be the total of the mounts listed below it. If the root partition has pending space, modification of the partition table is required.
Note: The steps below does not remove the data of the partition, only the partition map is being re-written. However, if the system is rebooted before completion of the step, the partition is corrupted and system maybe inaccessible
Update partition table
Once you have identified the partition table to update, use the steps below to make changes to the partition table. In the example, we are updating the partition table for /home under sda2.
1
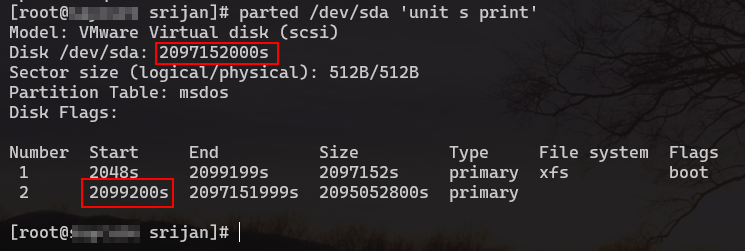
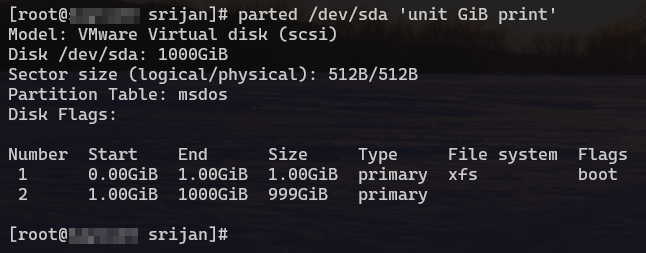
parted /dev/sda 'unit s print'
Keep note of the sector value for the partition and start value of the mount you are planning to update
To verify which is the intended mount point you can try printing the list directory in GB or MB
In order to extend the partition size, the partition should be in the last of the list. If any additional partition is listed after the intended please remove it following the step in removing partition from table
Once you have noted the required information, go ahead and follow the steps below to:
1
2
3
4
parted /dev/sda
(parted) rm 2
Warning: Partition /dev/sda2 is being used. Are you sure you want to continue?
Yes/No? Yes
Do not restart on the prompt below. If you restart the machine, it may be inaccessible
Ignore the below error
1
2
3
Error: Partition(s) 2 on /dev/sda have been written, but we have been unable to inform the kernel of the change, probably because
it/they are in use.  As a result, the old partition(s) will remain in use.  You should reboot now before making further changes.
Ignore/Cancel? Ignore
Ensure the partition was removed using p option. Continue to re-creating the partition table
1
2
3
4
5
(parted) mkpart
Partition type?  primary/extended? primary
File system type?  [ext2]? ext4
Start? <start sector value>
End? <end sector value>
Replace the <start sector value> and <end sector value> with the value copied earlier.
Ensure the partition was created using p option.
1
(parted) p
After the above step, the changes will still not be reflected. To complete the step resize is required.
Option 1: Using resize2fs
1
2
3
4
5
resize2fs /dev/sda2
resize2fs 1.42.9 (28-Dec-2013)
Filesystem at /dev/sda2 is mounted on /; on-line resizing required
old_desc_blocks = 2, new_desc_blocks = 2
The filesystem on /dev/sda2 is now 2871440 (4k) blocks long.
Option 2: using lvextend (Recommended)
1
lvextend -r -l +100%FREE /dev/mapper/centos-root
Verify changes
Verify if the storage change is reflecte using df -h command
The above mentioned steps should succesfully resize the partition
Optional: Remove partition from table
1
2
3
parted /dev/sda
(parted) p
(parted) rm 3 #the number here is from the output of the command above.
